Comments

The Perfect Testing Stack

Testing is important. Your test suite should be just as elegant and thought through as your application code. Over the past year, I’ve landed on what I think is the perfect combination of gems for testing Rails/Ruby applications.

Here’s what my Gemfile usually looks like when I’m starting out:

1
2
3
4
5
6
7
8
9
10
11
12
13
14
15
16
17
18
19
20
21
22
23
24
25
26
group :development, :test do
  gem 'rspec-rails', '~> 2.12.0'

  # Auto testing
  gem 'guard-rspec'
  gem 'guard-spork'
  gem 'ruby_gntp'
  gem 'rb-fsevent', '~> 0.9.1'

  # JavaScript
  gem 'konacha'
  gem 'chai-jquery-rails'
  gem 'sinon-chai-rails'
  gem 'sinon-rails'
  gem 'ejs'
end

group :test do
  gem 'capybara'
  gem 'poltergeist'
  gem 'webmock'
  gem 'factory_girl_rails'
  gem 'shoulda-matchers'
  gem 'faker'
  gem 'database_cleaner'
end

Unit Testing

I always start with testing models heavily. This layer, after all, is essentially the internal API to your application, and ignoring low level tests here could result in difficult to debug edge cases further down the road. All my tests are written using RSpec, which is a no brainer. I’ll then combine this with Shoulda Matchers (for testing validations, associations), Factory Girl (for generating records to test against) and Faker (for quickly generating fake content in factories).

For mocks and stubs, I use the built in mocking framework that ships with RSpec. I’ve yet to run into any situations where I need more from a mocking framework, so this works well.

Acceptance Testing

For high level integration tests, I use Capybara, another no brainer. I’ve recently started using the Poltergeist driver for running specs that need JavaScript, which has been a huge improvement over capybara-webkit, since it’s far less buggy and has no dependencies other than PhantomJS, which is very easy to install.

JavaScript Testing

For unit testing JavaScript, I recently switched from Jasmine to Konacha + Mocha. Getting jasmine to play nice in a CI environment with Rails 3 and the asset pipeline is like pulling teeth. With Konacha, it just works.

Combine this with Chai and Sinon and you’ve got a very solid solution for BDD’ing JavaScript. Konacha also allows you to use Capybara drivers to test the JavaScript specs in a CI environment, which works great with Poltergeist.

Tying it Together

Running tests isn’t much use if they’re slow. Doing TDD/BDD can be a huge boost in productivity, but only if your tests are fast and are only being run when they’re needed. To make tests run as quickly as possible, I use Guard + Spork. Guard will run the applicable spec for a file whenever it’s changed, and Spork preloads the rails environment at boot. If I’m working on a model, I can get near instant test results after saving the file by using this setup.

Conclusion

The above has worked incredibly well for me over the past year, and is what I used to build the test suite for 24pullrequests.com. Hopefully this will help you in making the right decisions on what to use with your stack!

Comments

Handling Mass Assignment With Active Admin

With the recent Github security vulnerability, a lot of people have been paying closer attention to security in their Rails applications, mainly when dealing with mass assignment.

However, locking down mass assignment can be very inconvenient when dealing with admin interfaces where you need to allow certain users to mass assign attributes that a regular user shouldn’t be able to do. Fortunately, there’s an easy way to get past this by using Rails 3.1’s scoped mass assignment

Scoped Mass Assignment

Scoped mass assignment allows you to assign a set of attributes to a certain ‘scope’ that you can then specify when calling create or update_attributes. Essentially, it allows you to do something like this:

1
2
3
4
5
6
7
8
9
10
11
12
13
14
15
16
17
18
# app/models/post.rb
class Post < ActiveRecord::Base
  attr_accessible :title, :content
  attr_accessible :title, :content, :published, as: :admin
end

# app/controllers/posts_controller.rb
def create
  # If the current user is an admin, this will allow the `published` attribute
  # to be mass assigned.
  if current_user.admin?
    @post = Post.new(params[:post], as: :admin)
  else
    @post = Post.new(params[:post])
  end
  @post.save
  respond_with @post
end

The above code will only allow the published attribute to be mass assigned if the current user is an admin.

Scoped Mass Assignment with Active Admin

Scoped mass assignment works fine when we’re writing the controllers ourselves, but how do we assign a scope when using active admin, where controllers are automatically created for us? Well, fortunately, active admin makes use of inherited_resources, which provides a class method called with_role.

By appending a few lines of code to our active admin initializer, we can assign the admin scope to all model calls while under the admin interface:

1
2
3
4
5
6
# config/initializers/active_admin.rb
module ActiveAdmin
  class BaseController
    with_role :admin
  end
end

Now, whenever a post is created or updated by a user using the admin interface, the :admin scope will be used, which will allow the published attribute to be mass assigned.

If we had a role field on our AdminUser model we could even take this a step further by overriding the role_given? and as_role methods:

1
2
3
4
5
6
7
8
9
10
11
12
# config/initializers/active_admin.rb
module ActiveAdmin
  class BaseController
    def role_given?
      current_admin_user.role
    end

    def as_role
      { as: current_admin_user.role.downcase.to_sym }
    end
  end
end

Now, we can easily set the security for these roles in our model:

1
2
3
4
5
# config/initializers/post.rb
class Post < ActiveRecord::Base
  attr_accessible :title, :content, as: :editor
  attr_accessible :published, as: :publisher
end

Related Resources

Comments

Salesforce OAuth2 Authentication With Active Admin

Here’s a quick and dirty guide to get OAuth2 authentication working for Active Admin using the Salesforce strategy.

Instructions

Add the omniauth gem to your Gemfile and run bundle install.

1
2
3
# Gemfile

gem 'omniauth-salesforce'

Configure devise to use the Salesforce strategy for omniauth.

1
2
3
4
# config/initializers/devise.rb

require 'omniauth-salesforce'
config.omniauth :salesforce, ENV["SFDC_CLIENT_ID"], ENV["SFDC_CLIENT_SECRET"]

Add :omniauthable to the devise call in the AdminUser model and add a class method for retrieving the admin user based on the oauth access token.

1
2
3
4
5
6
7
8
9
10
11
12
13
14
15
# app/models/admin_user.rb

class AdminUser < ActiveRecord::Base
  devise :database_authenticatable, :omniauthable,
         :recoverable, :rememberable, :trackable, :validatable

  def self.find_for_salesforce_oauth(access_token, signed_in_resource=nil)
    data = access_token.extra
    if admin_user = AdminUser.where(:email => data.email).first
      admin_user
    else
      AdminUser.create!(:email => data.email, :password => Devise.friendly_token[0, 20])
    end
  end
end

Add an omniauth controller to the devise_for call in the routes file.

1
2
3
4
5
# config/routes.rb

devise_config = ActiveAdmin::Devise.config
devise_config[:controllers][:omniauth_callbacks] = 'admin_users/omniauth_callbacks'
devise_for :admin_users, devise_config

Add a controller to handle the omniauth callback.

1
2
3
4
5
6
7
8
9
10
11
12
13
14
15
16
17
18
19
# app/controllers/admin_users/omniauth_callbacks_controller.rb

class AdminUsers::OmniauthCallbacksController < Devise::OmniauthCallbacksController
  def salesforce
    @admin_user = AdminUser.find_for_salesforce_oauth(auth_hash, current_admin_user)

    if @admin_user.persisted?
      flash[:notice] = I18n.t "devise.omniauth_callbacks.success", :kind => "Salesforce"
      sign_in_and_redirect @admin_user, :event => :authentication
    else
      session['devise.salesforce_data'] = auth_hash
      redirect_to new_admin_user_registration_url
    end
  end

  def auth_hash
    request.env["omniauth.auth"]
  end
end

Override the Active Admin login page in your application and add a link to sign in using Salesforce.

1
2
3
4
5
6
7
8
9
10
11
12
13
14
15
16
17
18
19
20
21
22
23
# app/views/active_admin/devise/sessions/new.html.erb

<div id="login">
  <h2><%= title "#{active_admin_application.site_title} Login" %></h2>
  <div class="oauth_providers" style="margin-top: 40px;">
    <%= link_to 'Sign in with Salesforce', admin_user_omniauth_authorize_path(:salesforce) %>
  </div>

  <% scope = Devise::Mapping.find_scope!(resource_name) %>
  <%= active_admin_form_for(resource, :as => resource_name, :url => send(:"#{scope}_session_path"), :html => { :id => "session_new" }) do |f|
    f.inputs do
      Devise.authentication_keys.each { |key| f.input key, :input_html => {:autofocus => true}}
      f.input :password
      f.input :remember_me, :as => :boolean, :if =>  false  #devise_mapping.rememberable? }
    end
    f.buttons do
      f.commit_button "Login"
    end
  end
  %>

  <%= render :partial => "active_admin/devise/shared/links" %>
</div>
Comments

Metaforce - a Ruby Gem for Interacting With the SFDC Metadata API

I’d like to introduce you to a little pet project I’ve been working on in my spare time; Metaforce. Metaforce is a Ruby gem that abstracts the Salesforce Metadata API, which is a Soap based API for CRUD’ing metadata on Salesforce organizations.

Why, you ask? Mainly because I don’t like Ant or the Migration tool. I’d much rather use Rake for migrations than bother with Java based tools. And hey, it’s fun. Not only that, but because it’s a gem, other developers can build awesome tools on top of it, whether that’s in Rails, Sinatra, or whatever you please, without having to delve into the nitty gritty of the Soap API.

You can get started with Metaforce by installing it:

1
gem install metaforce --pre

Once installed, using it is as simple as configuring your credentials:

1
2
3
4
5
6
7
8
Metaforce.configure do |config|
  config.username = "me@test.com"
  config.password = "mypassword"
  config.security_token = "mysecuritytoken"
  config.test = true # if you're on a sandbox org
end

client = Metaforce::Metadata::Client.new

And then performing the task you want to do. For example, if you want to list all metadata types on your organization, you can call .describe.

1
client.describe

And it will return a hash with the results.

Or if you want to list the members of a particular metadata type, you can call .list.

1
client.list :type => "ApexClass"

You can even deploy code to an organization:

1
2
deployment = client.deploy File.dirname(__FILE__)
puts deployment.result :wait_until_done => true

Metaforce is currently under active development and there’s a lot of features I’d like to add. You should only use it for testing right now.

For more information, check out the project on GitHub, and don’t be afraid to browse through the specs for example usage.

Comments

How to Install Rbenv on OS X

rbenv is a tool for managing ruby versions. It’s similar to RVM but doesn’t require configuration files. Instead of using gemsets, the user is expected to make use of bundler to manage gem dependencies.

Installation

Install rbenv from GitHub:

1
$ git clone git://github.com/sstephenson/rbenv.git ~/.rbenv

Add the following lines to your ~/.zshrc or ~/.bash_profile.

1
2
export PATH="$HOME/.rbenv/bin:$PATH"
eval "$(rbenv init -)"

Restart your terminal then install ruby-build:

1
2
3
4
$ cd
$ git clone git://github.com/sstephenson/ruby-build.git
$ cd ruby-build
$ [sudo] ./install.sh

Install the latest version of Ruby (1.9.3-p0) and activate it:

1
2
3
$ rbenv install 1.9.3-p0
$ rbenv global 1.9.3-p0
$ rbenv rehash

Restart the terminal again, then update RubyGems:

1
$ gem update --system

rbenv makes use of shims for all binaries, including gems. When you install a new gem, you need to run rbenv rehash to generate the shims. This can be done automatically by installing the rbenv-rehash gem:

1
$ gem install rbenv-rehash

Last but not least, you’ll probably want to install bundler:

1
$ gem install bundler

rbenv can make use of gemsets by installing the rbenv-gemset plugin, however, the preferred method is to use bundler to manage gem dependencies. If you use oh my zsh, you can activate the bundler plugin, which allows you to run gem executables without prefixing them with bundle exec.

Just add the following to your ~/.zshrc:

1
plugins=(bundler)

And, just in case you want a system wide installation on a linux server, here’s the code to set that up on Ubuntu 10.04, courtesy of @benwoodward.

Comments

Force.com Syntax Highlighting for VIM

I despise Eclipse and the Force.com IDE; it’s an extremely bloated piece of software. Thanks to Eclim, it’s possible to take advantage of the good parts of Eclipse but use VIM to edit apex classes, visualforce pages, etc.

I’ve released a small set of VIM scripts for syntax highlighting Apex, Visualforce and Apex logs, which is available for download on Github.

Apex Class

Apex

Visualforce Page

Visualforce

Comments

Installing Mac OS X Snow Leopard on ASUS P5N-E SLI

Specs

What you’ll need

  • Snow Leopard
  • Empire EFI
  • IDE DVD Drive (SATA Drive’s won’t work, it will stall with “Still waiting for root device”)

Instructions

  1. Burn Empire EFI Legacy (iBoot may also work using this method)
  2. Boot Empire EFI
  3. Remove Empire EFI from the DVD Drive. Insert Snow Leopard and press F5
  4. Press Enter to boot the Snow Leopard Installer
  5. Partition and format the hard drive then install Snow Leopard as normal
  6. When the installation is complete, remove Snow Leopard and re-insert Empire EFI into the DVD Drive
  7. Boot Empire EFI again. Select Snow Leopard and press Enter
  8. Follow the iBoot guide to install 10.6.8 combo update
  9. During MultiBeast setup, select the following:
    • EasyBeast
    • System Utilities
    • FakeSMC
    • IOUSBFamily Rollback
    • JMicron ATA
    • PCIRootUID=1 Fix
    • GraphicsEnabler=Yes
  10. DO NOT REBOOT! Install AppleNForceATA.kext to /Extras/Extensions
  11. Run: sudo chown -R root:wheel /Extras/Extensions/*
  12. Now run /Applications/Kext Utility.app
  13. Reboot and enjoy OS X 10.6.8!

You should now have working ethernet, and dual screen monitor support. I’ve yet to get my SATA DVD Drive to function.

Comments

Native Windows Controls in .NET

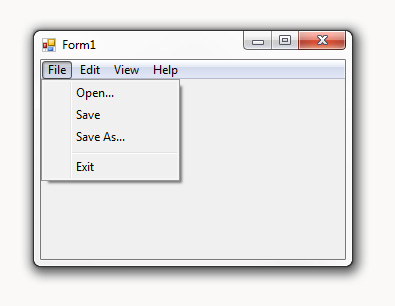
I came across a very frustrating issue while writing uTorrent Notifier; the fact that the default context menu/main menu controls look absolutely hideous. They use the Office 2007 look and feel and I think I speak for most people when I say that Office 2007 was not exactly the holy grail of good design. However, the Windows Vista/7 context menu’s look very sleek.

So after endless google searches on the subject of integrating native Win32 controls with .NET I came across this post. It’s actually really quite simple get native looking context menu’s/main menu’s in .NET, all it requires is using the “Context Menu” control rather than the “Context Menu Strip” control.

In Visual C# Express 2008 you can add this to the toolbox by right clicking on the toolbox and selecting “Customize”, then look for the “ContextMenu” control and “MainMenu”.

Comments

The Arduino Focuser

UPDATE: The Ardunio Focuser was just featured in the October issue of Astronomy Now magazine in the UK. Read about it on page 76-77!

ArduinoIn case you’ve never heard of it, the “Arduino is a tool for the design and development of embedded computer systems, consisting of a simple open hardware design for a single-board microcontroller, with embedded I/O support and a standard programming language.” In other words, it kicks ass.

This is where I decided to start my homemade ASCOM compliant computerized focuser. My goal was to use the Arduino to control a single stepper motor that in turn would be controlled by auto focusing software such as MaximDL or FocusMax using an ASCOM driver.

This is where I decided to start my homemade ASCOM compliant computerized focuser. My goal was to use the Arduino to control a single stepper motor that in turn would be controlled by auto focusing software such as MaximDL or FocusMax using an ASCOM driver.

The Hardware

The stepper motor I’m using is an old stepper I had from a single axis drive system for and EQ3 mount, which is a high resolution (geared) stepper motor.
In order to control the stepper motor, I came across a motor shield by Adafruit Industries. It also included a library for microstepping, which made it ideal for high precision focus control. The stepper motor is connected to the Arduino board via the motor shield through an RS232 cable.

The Software

The software can be found at https://github.com/ejholmes/Arduino-Focuser. The code is licensed under the GPL V2, so feel free to use it freely, but please mention my initial project!

The Final Product

It supports absolute positioning of the focuser up to around 13,000 points (on my focuser) of focus.